
Back
Back
SMC Concepts
Chapter
4
Failure Swings, Equal Highs and Equal Lows
Not all Swing Highs and Swing Lows are the same, a Failure Swing refers to a Swing Point that is considered 'irrelevant', when it comes to analysing a chart's market structure.
Published by Trader Tips,
Published by Trader Tips,
What are Failure Swings?
A Failure Swing is created when price creates a new Swing Point that was close to hitting a previous External Range Liquidity level, but wasn't able to reach it.
This leaves the External Liquidity Pool untouched, where it can act as a future liquidity target.
Failure Swing High

Failure Swing High.
A Failure Swing High is created when price pushes up to a previous Swing High but reverses before reaching it, creating a Lower High.
Failure Swing Low

Failure Swing Low.
A Failure Swing Low is created when price pushes down to a previous Swing Low but reverses before reaching it, creating a Higher Low.
Failure Swings vs Significant Swings
One of the most common things that SMC traders struggle with is correctly identifying which Swing Highs and Swing Lows are valid External Range Liquidity targets, and which aren't.
When it comes to defining a draw on liquidity target, we do not use Failure Swings. We always use Significant Swings as our expected targets.
The reason being comes down to which swing point most people would be using as for their stop loss placements, which would be at the most obvious external swing of a range, aka Significant Swings.
Significant Swings

Significant Swing High vs Failure Swing High.
A Significant Swing is the most external Swing High/Swing Low in a range.
These are the swings that we can expect price to target because that is where the most stop loss orders will be positioned.
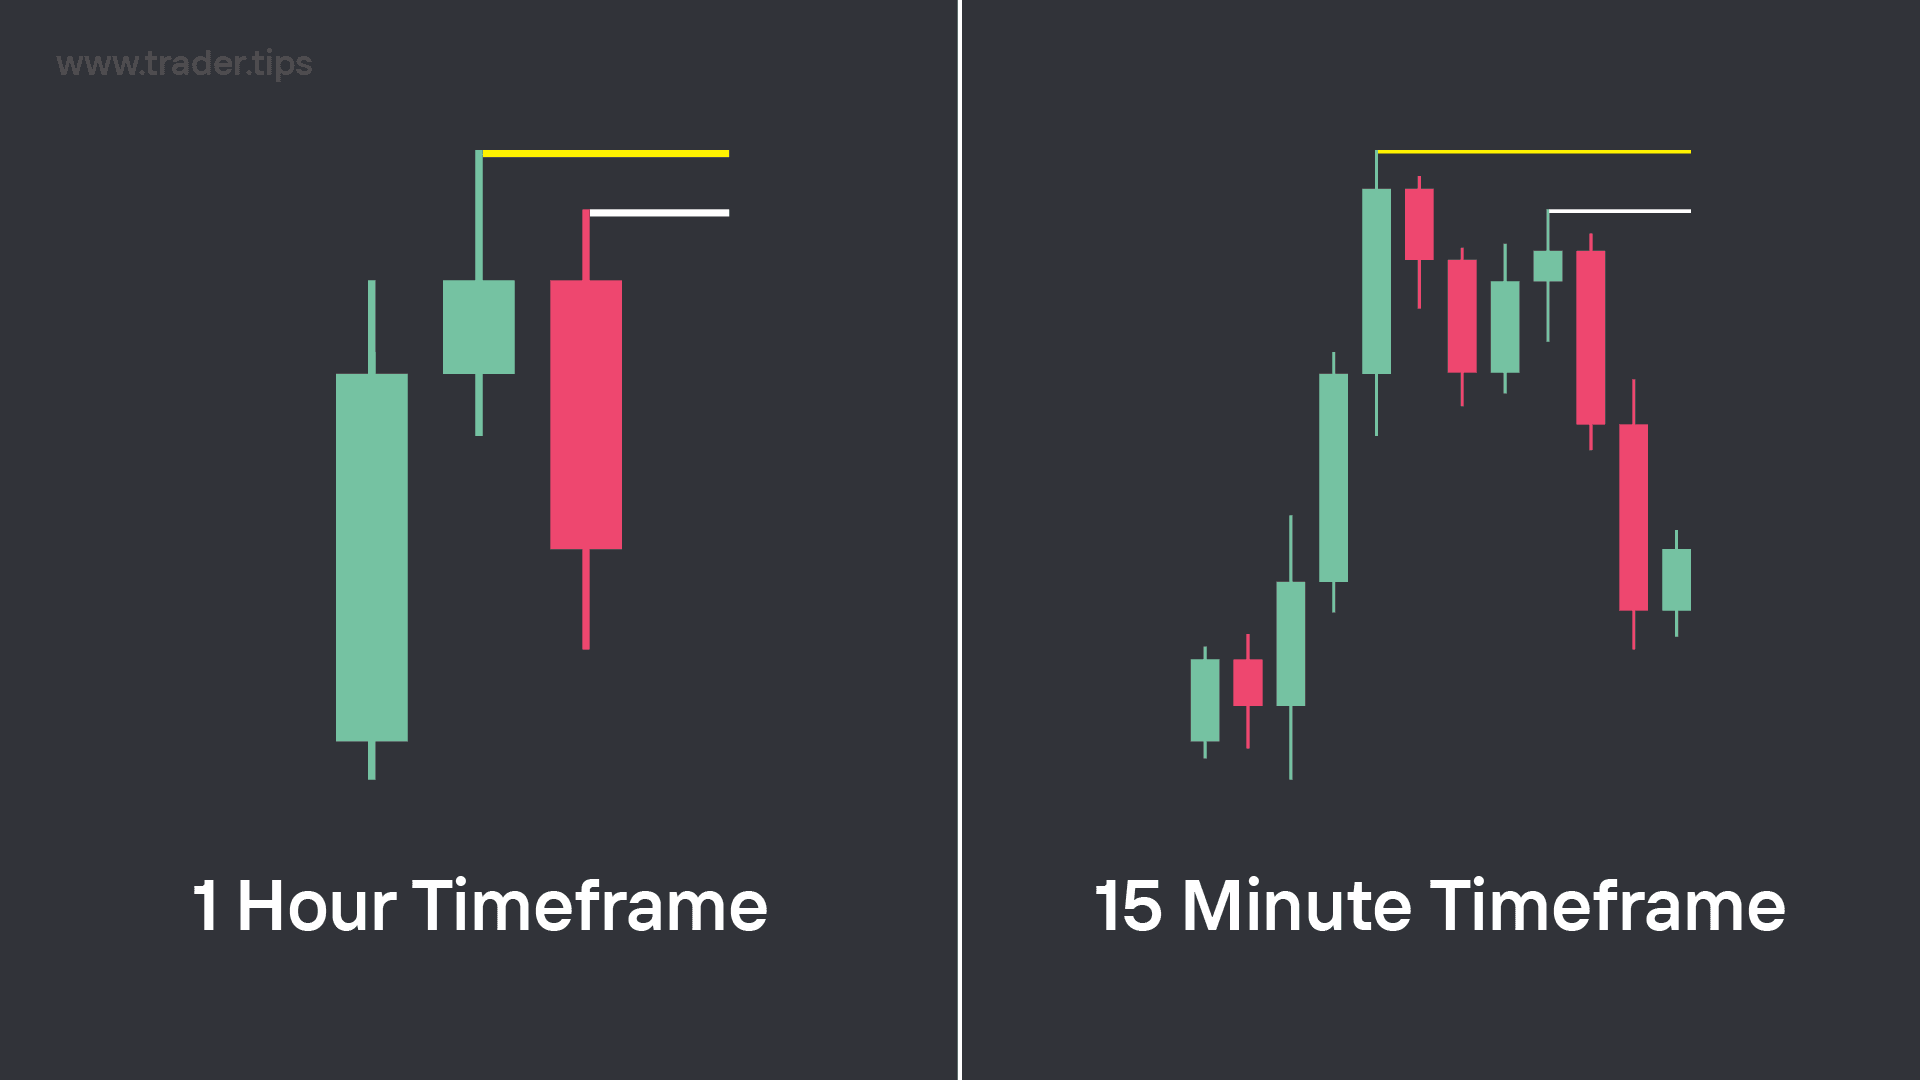
1 Hour Timeframe Swing vs 15 Minute Timeframe Swing.
One of the easiest ways to understand why Significant Swings are the important key levels for targeting liquidity is by simply viewing the swing level through a higher timeframe.
For example, in the image above, on the right side we have a 15 minute chart that contains a Swing High (Significant Swing) followed by a Lower High (Failure Swing).
There will be some amount of traders using both of these 15 minute Swing High levels as their stop loss placements.
But when we look at 1 Hour timeframe chart on the left side, the 15 minute Lower High (Failure Swing) just makes up the 3rd candle in the overall structure of the 1 hour Swing High.
This detail is what is important because whilst there will be some traders using the 15 minute Failure Swing for their stop loss, the far majority will be using the most external 15 minute Swing High.
But on top of this, there will also be higher timeframe traders also using the 1 hour Swing High for their stop loss placements.
As traders, we need to understand where the most liquidity would be sitting because that is where the most convenient target for Institutions would be.
Failure Swings in Ranges
Within a range, there will likely be many Swing Highs and Swing Low, but when it comes to defining a range, we always want to use the most external Swing High and Swing Low as our range definers.
The Failure Swings inside of a range should just be treated as a stronger reasoning for as to why the market would want to target the External Range Liquidity level above it.
Failure Swing Liquidity
When price creates Failure Swings, this is deemed as a
Significant Swings vs Failure Swings Price Separation
ITH and ITL
A simple way to identify Significant swing points is through the concepts of ITLs (Intermediate Term High) and ITLs (Intermediate Term Low).
ITH (Intermediate Term High)
An ITH is created when a Swing High is positioned in a way where it has a Lower High on it's left and a Lower High on it's right.
This becomes a Significant level because it
Understanding why
Failure Swings
Consolidation via Failure Swings
In traditional technical analysis, a Failure Swing would identify as a Lower High or a Higher Low.
Which is indicative of a trending structure.
However, in SMC trading, our main focus is finding liquidity pools that the market is targeting.
How to identify the Important Liquidity Levels
ITH/ITLs
What are Failure Swings?
A Failure Swing is created when price creates a new Swing Point that was close to hitting a previous External Range Liquidity level, but wasn't able to reach it.
This leaves the External Liquidity Pool untouched, where it can act as a future liquidity target.
Failure Swing High
Failure Swing High.
A Failure Swing High is created when price pushes up to a previous Swing High but reverses before reaching it, creating a Lower High.
Failure Swing Low
Failure Swing Low.
A Failure Swing Low is created when price pushes down to a previous Swing Low but reverses before reaching it, creating a Higher Low.
Failure Swings vs Significant Swings
One of the most common things that SMC traders struggle with is correctly identifying which Swing Highs and Swing Lows are valid External Range Liquidity targets, and which aren't.
When it comes to defining a draw on liquidity target, we do not use Failure Swings. We always use Significant Swings as our expected targets.
The reason being comes down to which swing point most people would be using as for their stop loss placements, which would be at the most obvious external swing of a range, aka Significant Swings.
Significant Swings
Significant Swing High vs Failure Swing High.
A Significant Swing is the most external Swing High/Swing Low in a range.
These are the swings that we can expect price to target because that is where the most stop loss orders will be positioned.
1 Hour Timeframe Swing vs 15 Minute Timeframe Swing.
One of the easiest ways to understand why Significant Swings are the important key levels for targeting liquidity is by simply viewing the swing level through a higher timeframe.
For example, in the image above, on the right side we have a 15 minute chart that contains a Swing High (Significant Swing) followed by a Lower High (Failure Swing).
There will be some amount of traders using both of these 15 minute Swing High levels as their stop loss placements.
But when we look at 1 Hour timeframe chart on the left side, the 15 minute Lower High (Failure Swing) just makes up the 3rd candle in the overall structure of the 1 hour Swing High.
This detail is what is important because whilst there will be some traders using the 15 minute Failure Swing for their stop loss, the far majority will be using the most external 15 minute Swing High.
But on top of this, there will also be higher timeframe traders also using the 1 hour Swing High for their stop loss placements.
As traders, we need to understand where the most liquidity would be sitting because that is where the most convenient target for Institutions would be.
Failure Swings in Ranges
Within a range, there will likely be many Swing Highs and Swing Low, but when it comes to defining a range, we always want to use the most external Swing High and Swing Low as our range definers.
The Failure Swings inside of a range should just be treated as a stronger reasoning for as to why the market would want to target the External Range Liquidity level above it.
Failure Swing Liquidity
When price creates Failure Swings, this is deemed as a
Significant Swings vs Failure Swings Price Separation
ITH and ITL
A simple way to identify Significant swing points is through the concepts of ITLs (Intermediate Term High) and ITLs (Intermediate Term Low).
ITH (Intermediate Term High)
An ITH is created when a Swing High is positioned in a way where it has a Lower High on it's left and a Lower High on it's right.
This becomes a Significant level because it
Understanding why
Failure Swings
Consolidation via Failure Swings
In traditional technical analysis, a Failure Swing would identify as a Lower High or a Higher Low.
Which is indicative of a trending structure.
However, in SMC trading, our main focus is finding liquidity pools that the market is targeting.
How to identify the Important Liquidity Levels
ITH/ITLs
Next Course
Ready To Trade?